日記」カテゴリーアーカイブ

Prometheusを動かしてみる

自宅の環境にPrometheusを導入してみたくなり、まずは使ってみることにしました。

前提

この記事は以下のバージョンを前提にしています。

  • Ubuntu 18.04.2 LTS
  • Prometheus 2.8.0
  • Node Exporter 0.17.0

Prometheusインストール・起動

PrometheusはGoで開発されているので、バイナリと設定ファイルがまとまったtar ballをダウンロードし、設定を修正後にバイナリを実行すればよいです。

ubuntu@prom:~$ wget https://github.com/prometheus/prometheus/releases/download/v2.8.0/prometheus-2.8.0.linux-amd64.tar.gz
ubuntu@prom:~$ tar -xzf prometheus-2.8.0.linux-amd64.tar.gz
ubuntu@prom:~$ cd prometheus-2.8.0.linux-amd64
ubuntu@prom:~/prometheus-2.8.0.linux-amd64$ ls -l
total 103492
-rw-r--r-- 1 ubuntu ubuntu    11357 Mar 12 09:01 LICENSE
-rw-r--r-- 1 ubuntu ubuntu     2770 Mar 12 09:01 NOTICE
drwxr-xr-x 2 ubuntu ubuntu     4096 Mar 12 09:01 console_libraries
drwxr-xr-x 2 ubuntu ubuntu     4096 Mar 12 09:01 consoles
-rwxr-xr-x 1 ubuntu ubuntu 65272078 Mar 12 07:48 prometheus
-rw-r--r-- 1 ubuntu ubuntu      926 Mar 12 09:01 prometheus.yml
-rwxr-xr-x 1 ubuntu ubuntu 40669742 Mar 12 07:49 promtool
ubuntu@prom:~/prometheus-2.8.0.linux-amd64$ 
ubuntu@prom:~/prometheus-2.8.0.linux-amd64$ ./prometheus 
level=info ts=2019-03-23T04:55:54.749581666Z caller=main.go:285 msg="no time or size retention was set so using the default time retention" duration=15d
level=info ts=2019-03-23T04:55:54.749670041Z caller=main.go:321 msg="Starting Prometheus" version="(version=2.8.0, branch=HEAD, revision=59369491cfdfe8dcb325723d6d28a837887a07b9)"
level=info ts=2019-03-23T04:55:54.749700665Z caller=main.go:322 build_context="(go=go1.11.5, user=root@4c4d5c29b71f, date=20190312-07:46:58)"
level=info ts=2019-03-23T04:55:54.74972578Z caller=main.go:323 host_details="(Linux 4.15.0-46-generic #49-Ubuntu SMP Wed Feb 6 09:33:07 UTC 2019 x86_64 prom (none))"
level=info ts=2019-03-23T04:55:54.749750667Z caller=main.go:324 fd_limits="(soft=1024, hard=1048576)"
level=info ts=2019-03-23T04:55:54.749773265Z caller=main.go:325 vm_limits="(soft=unlimited, hard=unlimited)"
level=info ts=2019-03-23T04:55:54.751990415Z caller=main.go:640 msg="Starting TSDB ..."
level=info ts=2019-03-23T04:55:54.754091703Z caller=web.go:418 component=web msg="Start listening for connections" address=0.0.0.0:9090
level=info ts=2019-03-23T04:55:54.756149846Z caller=main.go:655 msg="TSDB started"
level=info ts=2019-03-23T04:55:54.756182656Z caller=main.go:724 msg="Loading configuration file" filename=prometheus.yml
level=info ts=2019-03-23T04:55:54.756896788Z caller=main.go:751 msg="Completed loading of configuration file" filename=prometheus.yml
level=info ts=2019-03-23T04:55:54.756915881Z caller=main.go:609 msg="Server is ready to receive web requests."

http://ipaddress:9090 を開くと /graphにリダイレクトし expression browerが表示される。ここから PromQLによるクエリを実行できる。

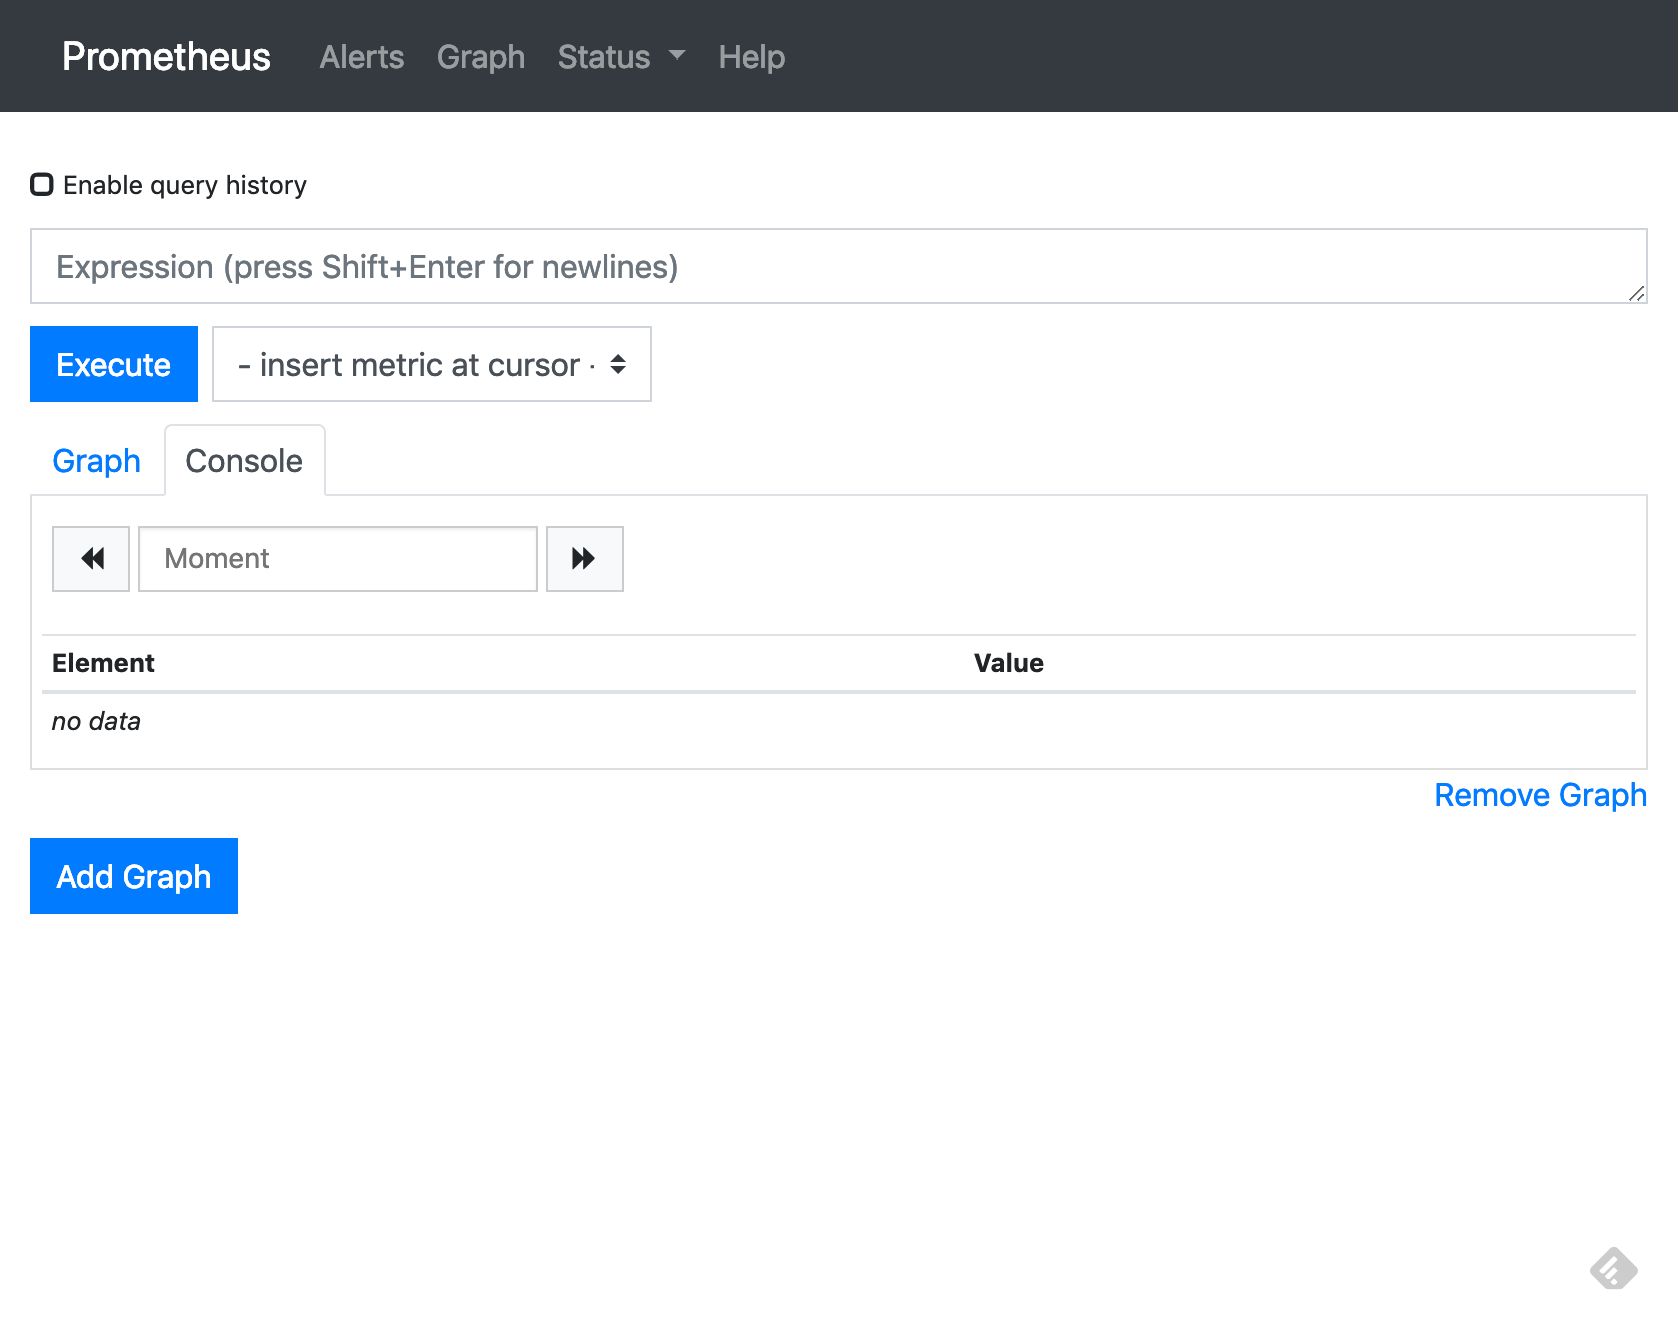
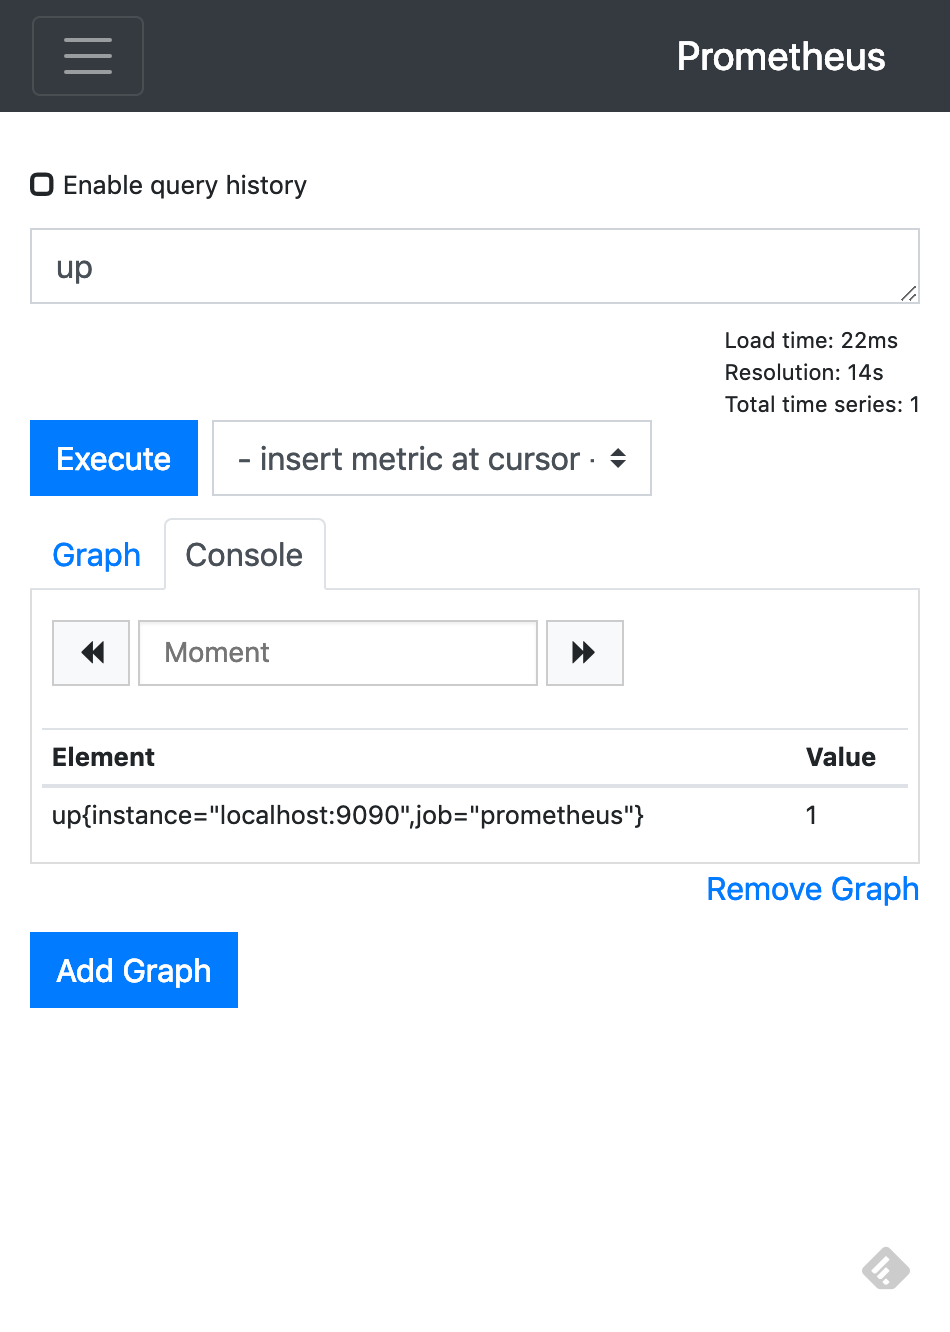
入力フィールドにupを入力し、ExecuteをクリックするとConsoleに
up{instance=”localhost:9090″,job=”prometheus”}の値が1と表示されます。これはprometheus jobのlocalhost:9090 targetのスクレイピングが成功したことを示します。prometheus jobは prometheus自体のmetricです。

これはデフォルトでprometheus.ymlに以下が書かれているためです。

scrape_configs:
  # The job name is added as a label `job=<job_name>` to any timeseries scraped from this config.
  - job_name: 'prometheus'

    # metrics_path defaults to '/metrics'
    # scheme defaults to 'http'.

    static_configs:
    - targets: ['localhost:9090']

Node Exporterのインストール・起動

Prometheusはソフトウェアごとに”Exporter”を動かし、HTTP GETで/metricsからメトリックを取得します。当然Exporterごとにポート番号は異なります。

Exporterにはofficialとそうでないものがあります。Prometheus GitHub organizationにあるものがofficialです。
officialでないもの含めThird-party exportersに一覧が、デフォルトポート番号の一覧はexporter default port wiki pageにあります。

ここではPrometheusを動かしたマシンにマシンメトリックを取得するNode Exporterをインストールします。Node ExporterもPrometheusと同様にバイナリと設定ファイルがまとまったtar ballをダウンロードし、設定を修正後にバイナリを実行すればよいです。

ubuntu@prom:~$ wget https://github.com/prometheus/node_exporter/releases/download/v0.17.0/node_exporter-0.17.0.linux-amd64.tar.gz
$ ubuntu@prom:~$ tar -xvf node_exporter-0.17.0.linux-amd64.tar.gz
$ cd node_exporter-0.17.0.linux-amd64 
ubuntu@prom:~/node_exporter-0.17.0.linux-amd64$ ./node_exporter 
INFO[0000] Starting node_exporter (version=0.17.0, branch=HEAD, revision=f6f6194a436b9a63d0439abc585c76b19a206b21)  source="node_exporter.go:82"
INFO[0000] Build context (go=go1.11.2, user=root@322511e06ced, date=20181130-15:51:33)  source="node_exporter.go:83"
INFO[0000] Enabled collectors:                           source="node_exporter.go:90"
INFO[0000]  - arp                                        source="node_exporter.go:97"
INFO[0000]  - bcache                                     source="node_exporter.go:97"
INFO[0000]  - bonding                                    source="node_exporter.go:97"
INFO[0000]  - conntrack                                  source="node_exporter.go:97"
INFO[0000]  - cpu                                        source="node_exporter.go:97"
INFO[0000]  - diskstats                                  source="node_exporter.go:97"
INFO[0000]  - edac                                       source="node_exporter.go:97"
INFO[0000]  - entropy                                    source="node_exporter.go:97"
INFO[0000]  - filefd                                     source="node_exporter.go:97"
INFO[0000]  - filesystem                                 source="node_exporter.go:97"
INFO[0000]  - hwmon                                      source="node_exporter.go:97"
INFO[0000]  - infiniband                                 source="node_exporter.go:97"
INFO[0000]  - ipvs                                       source="node_exporter.go:97"
INFO[0000]  - loadavg                                    source="node_exporter.go:97"
INFO[0000]  - mdadm                                      source="node_exporter.go:97"
INFO[0000]  - meminfo                                    source="node_exporter.go:97"
INFO[0000]  - netclass                                   source="node_exporter.go:97"
INFO[0000]  - netdev                                     source="node_exporter.go:97"
INFO[0000]  - netstat                                    source="node_exporter.go:97"
INFO[0000]  - nfs                                        source="node_exporter.go:97"
INFO[0000]  - nfsd                                       source="node_exporter.go:97"
INFO[0000]  - sockstat                                   source="node_exporter.go:97"
INFO[0000]  - stat                                       source="node_exporter.go:97"
INFO[0000]  - textfile                                   source="node_exporter.go:97"
INFO[0000]  - time                                       source="node_exporter.go:97"
INFO[0000]  - timex                                      source="node_exporter.go:97"
INFO[0000]  - uname                                      source="node_exporter.go:97"
INFO[0000]  - vmstat                                     source="node_exporter.go:97"
INFO[0000]  - xfs                                        source="node_exporter.go:97"
INFO[0000]  - zfs                                        source="node_exporter.go:97"
INFO[0000] Listening on :9100                            source="node_exporter.go:111"

http://ipaddress:9100 にアクセスするとNode Exporter文字列が表示されます。

http://ipaddress:9100/metricsからメトリックが取得できます。

ubuntu@prom:~$ curl http://ipaddress:9100/metrics                                                                       
# HELP go_gc_duration_seconds A summary of the GC invocation durations.                                                  
# TYPE go_gc_duration_seconds summary                                                                                    
go_gc_duration_seconds{quantile="0"} 1.4264e-05                                                                          
go_gc_duration_seconds{quantile="0.25"} 3.9649e-05                                                                       
go_gc_duration_seconds{quantile="0.5"} 9.7112e-05                                                                        
go_gc_duration_seconds{quantile="0.75"} 0.000147184                                                                      
go_gc_duration_seconds{quantile="1"} 0.003614629                                                                         
go_gc_duration_seconds_sum 0.062631656                                                                                   
go_gc_duration_seconds_count 896                                                                                         
# HELP go_goroutines Number of goroutines that currently exist.                                                          
# TYPE go_goroutines gauge                                                                                               
go_goroutines 8
(以下省略)

PrometheusからNode Exporterをモニタする

PrometheusでExporterで公開したメトリックを取得するには、prometheus.ymlを修正し、Prometheusを再起動またはSIGHUPシグナルを送ります。job名はなんでもよいが、ここではnodeとしました。

scrape_configs:
  # The job name is added as a label `job=<job_name>` to any timeseries scraped from this config.
  - job_name: 'prometheus'

    # metrics_path defaults to '/metrics'
    # scheme defaults to 'http'.

    static_configs:
    - targets: ['localhost:9090']

  - job_name: 'node'
    static_configs:
    - targets: ['localhost:9100']

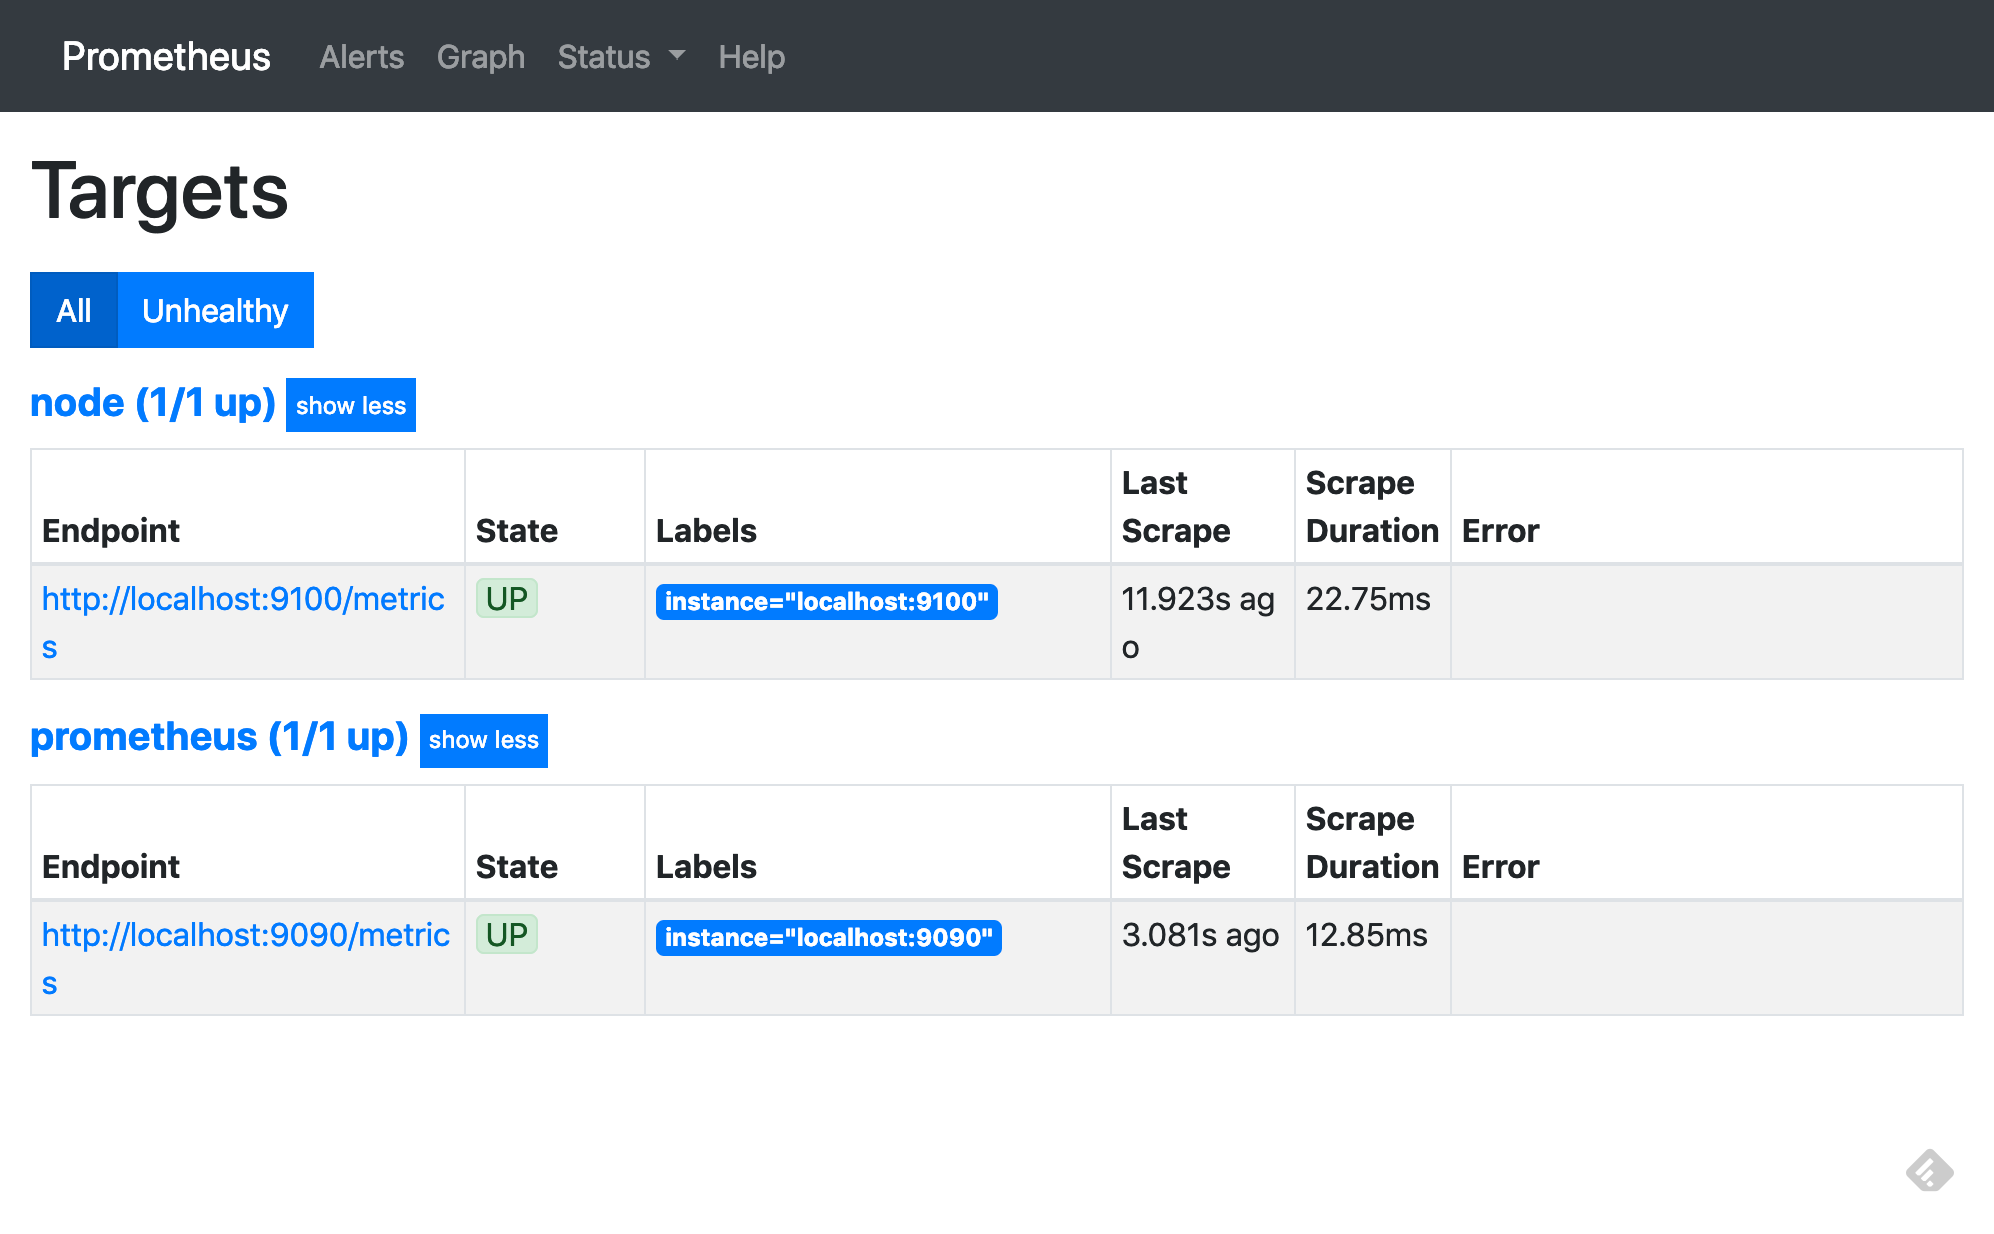
再起動後、Expression browserからStatus→Targetsをクリックすると、2つのTargetが表示され、両方のStateがUPになっています。

使ってみる

ここではNode exporter自体のメモリ使用量をグラフ表示してみます。
metricとしてprocess_resident_memory_bytes、label matcherとして job=”node”を指定します。
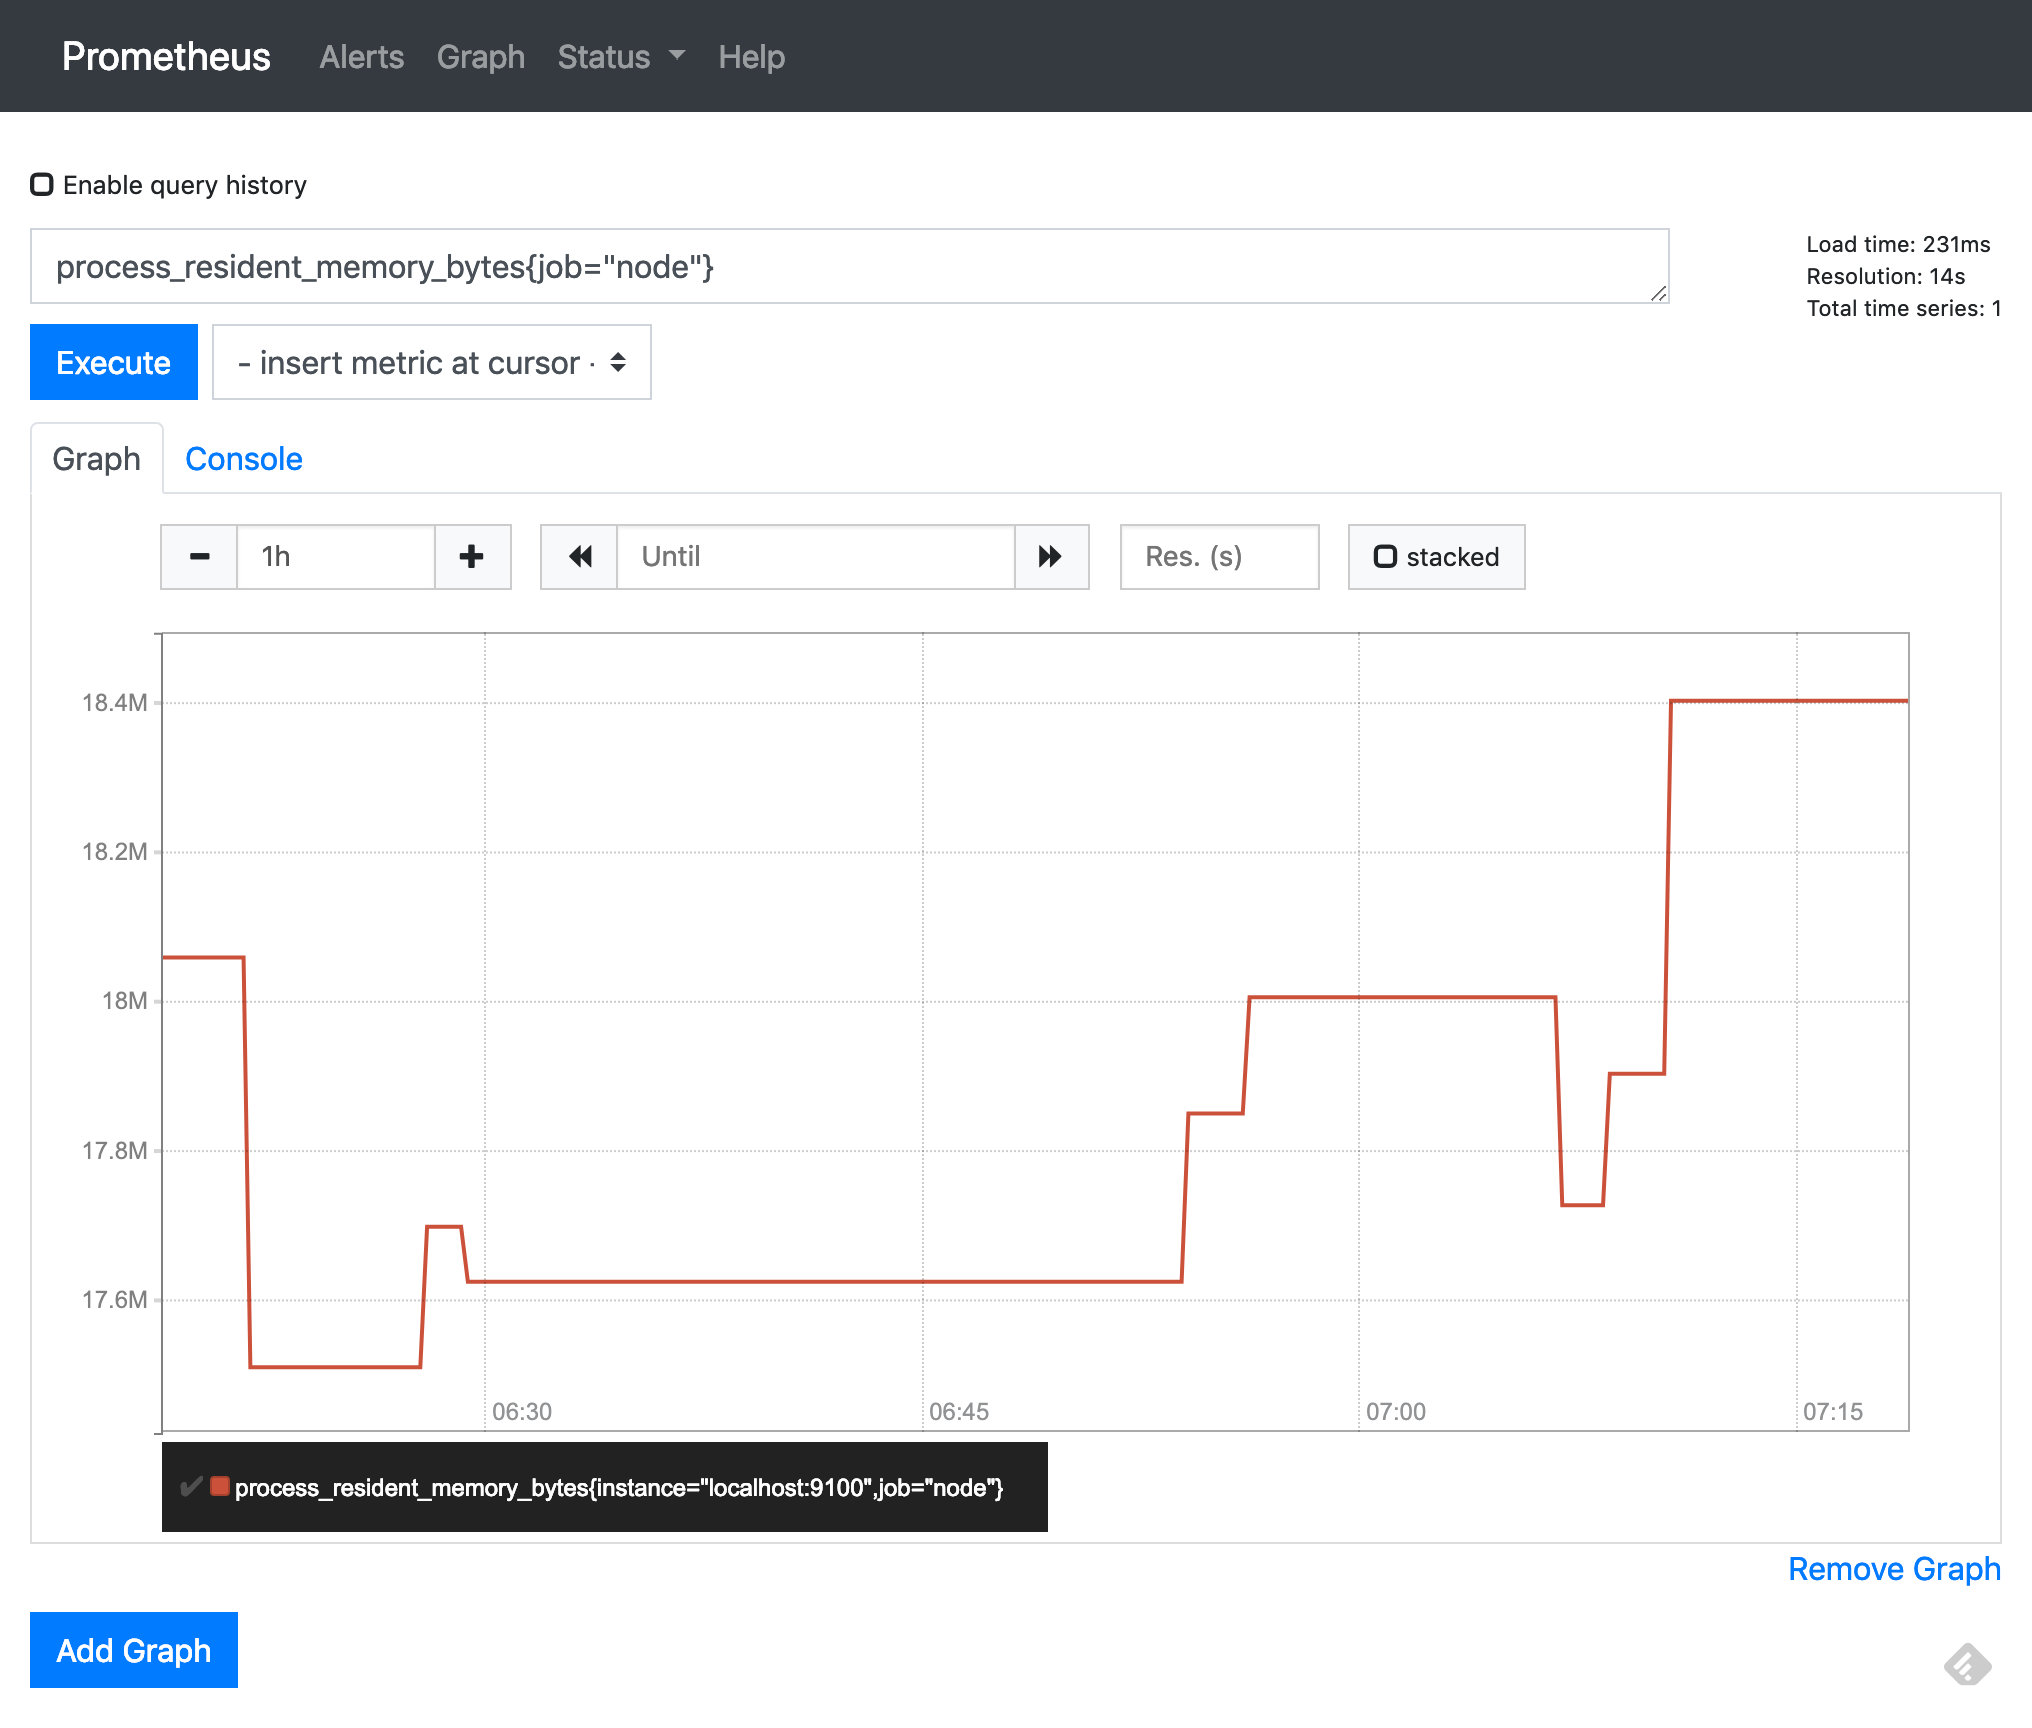
それっぽいグラフが表示されました。

Ubuntu 18.04にdnsmasqでローカルDNSをたてた

自宅のOpenStack用に、Ubuntu 18.04上にdnsmasqでローカルDNSをたてました。

自宅のOpenStackはコミュニティのインストールガイドにほぼ従っているので、コントローラとコンピュートの名前解決は/etc/hostsに書いています。インスタンスをたてて使っている分には問題なかったのですが、インスタンスの上でKubernetesクラスタを動かすとよろしくありません。KubernetesのPodはdnsPolicyがClusterFirstである場合、kube-dnsで解決出来ない名前解決は動いているノードに設定されているDNSサーバで名前解決します。そのため/etc/hostsではPodが名前解決できませんのでDNSサーバを建てることにしました。

dnsmasqはホストにある/etc/hostsをそのまま名前解決に使い、/etc/hostsにないものはホストのDNSサーバに問い合わせます。すでにControllerには/etc/hostsを書いているので、これを使います。

Controllerにdnsmasqをインストールします。

sudo apt install dnsmasq

dnsmasqの設定ファイルを修正します。

# Never forward plain names (without a dot or domain part)
domain-needed
# Never forward addresses in the non-routed address spaces.
bogus-priv
# Add local-only domains here, queries in these domains are answered
# from /etc/hosts or DHCP only.
local=/hidekazuna.localdomain/
# Set this (and domain: see below) if you want to have a domain
# automatically added to simple names in a hosts-file.
expand-hosts
# Set the domain for dnsmasq. this is optional, but if it is set, it
# does the following things.
# 1) Allows DHCP hosts to have fully qualified domain names, as long
#     as the domain part matches this setting.
# 2) Sets the "domain" DHCP option thereby potentially setting the
#    domain of all systems configured by DHCP
# 3) Provides the domain part for "expand-hosts"
domain=hidekazuna.localdomain

/etc/hostsを修正します。

# controller
10.0.0.11  controller.localdomain controller
# compute1
10.0.0.31  compute1.localdomain compute1
# compute2
10.0.0.32  compute2.localdomain compute2

dnsmasqを再起動します。

sudo systemctl restart dnsmasq

systemd-resolvedを再起動します。

sudo systemctl restart systemd-resolved

上記でうまくいかないときは、/etc/netplan/下に作成したネットワークの設定ファイルであるYAML形式のファイルから以下2つのファイルが生成されていることを確認します。1つ目のファイル名はインタフェース名により異なります。

  • /run/systemd/network/10-netplan-eno1.network
  • /run/systemd/resolve/resolv.conf

よくわからず自信がない場合は生成して適用後(systemd-networkdは再起動不要のようですが)systemd-networkd、systemd-resolved、dnsmasqを再起動します。

sudo netplan generate
sudo netplan apply
sudo systemctl restart systemd-networkd
sudo systemctl restart systemd-resolved
sudo systemctl restart dnsmasq

最後に名前解決できることを確認します。

$ dig controller

; <<>> DiG 9.11.3-1ubuntu1-Ubuntu <<>> controller
;; global options: +cmd
;; Got answer:
;; ->>HEADER<<- opcode: QUERY, status: NOERROR, id: 39671
;; flags: qr rd ra; QUERY: 1, ANSWER: 1, AUTHORITY: 0, ADDITIONAL: 1

;; OPT PSEUDOSECTION:
; EDNS: version: 0, flags:; udp: 65494
;; QUESTION SECTION:
;controller.			IN	A

;; ANSWER SECTION:
controller.		0	IN	A	10.0.0.11

;; Query time: 0 msec
;; SERVER: 127.0.0.53#53(127.0.0.53)
;; WHEN: Sun Jan 27 21:25:33 JST 2019
;; MSG SIZE  rcvd: 55
$ dig www.google.com

; <<>> DiG 9.11.3-1ubuntu1-Ubuntu <<>> www.google.com
;; global options: +cmd
;; Got answer:
;; ->>HEADER<<- opcode: QUERY, status: NOERROR, id: 27197
;; flags: qr rd ra; QUERY: 1, ANSWER: 1, AUTHORITY: 0, ADDITIONAL: 1

;; OPT PSEUDOSECTION:
; EDNS: version: 0, flags:; udp: 65494
;; QUESTION SECTION:
;www.google.com.			IN	A

;; ANSWER SECTION:
www.google.com.		219	IN	A	172.217.161.36

;; Query time: 8 msec
;; SERVER: 127.0.0.53#53(127.0.0.53)
;; WHEN: Sun Jan 27 21:27:13 JST 2019
;; MSG SIZE  rcvd: 59

ControllerにDNSサーバをたてたので、Computeから使うように設定変更します。Computeの設定は/etc/netplan/下にあるネットワーク設定ファイルのDNSサーバの値を変更したあと、2つのファイルを生成、適用してsystemd-resolvedを再起動します。

sudo netplan generate
sudo netplan apply
sudo systemctl restart systemd-resolved

名前解決できることを確認します。(下記はcompute2での実施例)

$ dig compute2

; <<>> DiG 9.11.3-1ubuntu1-Ubuntu <<>> compute2
;; global options: +cmd
;; Got answer:
;; ->>HEADER<<- opcode: QUERY, status: NOERROR, id: 24121
;; flags: qr rd ra; QUERY: 1, ANSWER: 1, AUTHORITY: 0, ADDITIONAL: 1

;; OPT PSEUDOSECTION:
; EDNS: version: 0, flags:; udp: 65494
;; QUESTION SECTION:
;compute2.			IN	A

;; ANSWER SECTION:
compute2.		0	IN	A	10.0.0.32

;; Query time: 0 msec
;; SERVER: 127.0.0.53#53(127.0.0.53)
;; WHEN: Sun Jan 27 21:43:08 JST 2019
;; MSG SIZE  rcvd: 53

$ dig www.google.com

; <<>> DiG 9.11.3-1ubuntu1-Ubuntu <<>> www.google.com
;; global options: +cmd
;; Got answer:
;; ->>HEADER<<- opcode: QUERY, status: NOERROR, id: 914
;; flags: qr rd ra; QUERY: 1, ANSWER: 1, AUTHORITY: 0, ADDITIONAL: 1

;; OPT PSEUDOSECTION:
; EDNS: version: 0, flags:; udp: 65494
;; QUESTION SECTION:
;www.google.com.			IN	A

;; ANSWER SECTION:
www.google.com.		219	IN	A	216.58.197.4

;; Query time: 6 msec
;; SERVER: 127.0.0.53#53(127.0.0.53)
;; WHEN: Sun Jan 27 21:43:10 JST 2019
;; MSG SIZE  rcvd: 59

hidekazu@compute2:~$

Certified Kubernetes Administrator (CKA) を取得しました

サイバーマンデーで試験とトレーニングがセットで179ドルだったのを利用して、1月6日にCertified Kubernetes Administrator (CKA) に合格できましたので、振り返っておきます。12月22日に1度受験して3%足りずに落ち、2回目で合格しました。1回再受験は無料でよかった!

試験概要

Candidate HandbookExam Tipsに書いてあります。自分の時はCandidate HandbookはVersion 1.15、Exam TipsはUpdated December, 2018でした。

方法 オンライン
時間 3時間
形式 パフォーマンスベース(コマンドを実行して課題を解決する)
問題数 24問
言語 問題文は英語、スペイン語、ポルトガル語、日本語、ドイツ語、中国語。試験官とのやりとり、ターミナルは英語のみ。(Handbook)
再受験 Cloud Native Computing Foundationから直接購入した場合、購入から12ヶ月の間に1回無料(Handbook)

試験環境

オンラインってどうやってやるの?と思いましたが、試験官とチャットして、画面共有して進めます。私の場合、最初にウェブカメラでパスポートを見せて、机の上を一通り、そのあと部屋をぐるっとカメラで写しました。
なお、自分はPCはMacBook、部屋は1DKのキッチン、机は無印良品の無垢材テーブルでした。MacBookの字が小さくて辛かった。。

勉強方法

仕事でKubernetes環境を管理していないので、体に馴染ませるためKubernetes完全ガイドのKubernetesの部分にある全てのコマンドを打ちました。この本は教科書的に網羅していて飽きてくるので、並行してDocker/Kubernetes 実践コンテナ開発入門を読みました。
また、前後してKubernetes The Hard Wayを2回やりました。1回目はただコピー、2回目は意味を考えながら(特に証明書関連)実行しました。
あと、試験準備に該当するかは微妙ですが、10月、11月には仕事で数件Kubernetesコミュニティに貢献しています。また、Raspberry Piにkubernetesクラスタをインストールして遊んでみたりしました。
購入したトレーニングは購入時点で大体準備を終えていたのでやりませんでした。

直前の準備

Candidate HandbookExam Tipsを読み直しました。Exam TipsをよくよくみたらKubernetesのバージョンが1.12、問題は3ヶ月ごとに更新を予定していると書いてありました。

試験はhttps://kubernetes.io/docs/​ とそのサブドメイン、https://kubernetes.io/blog​/​
を参照して良いことになっています。1回目はmanifestを全て手で書いていて時間が足らなかったので、コピーできるmanifestがどこにあるか、そこへたどり着く検索ワードを確認しておきました。

感想

3時間ずっとMacBookの画面をみてコマンドを打ち続けるのは思ったより大変でした。顔がカメラから外れてもいけないし、なんせ文字が小さい。
問題自体は基本的な知識を試す良い試験だと思いました。再受験1回無料なので、1回目で知識のあなを認識して再学習し、2回目で合格する自分のようなやり方もありだと思います。

JapanContainerDays v18.12 のスライドたち

追記: 公式はJapanContainerDays v18.12 公式資料まとめです。

12/4、5に聞きに行ったJapanContainerDays v18.12 のスライド一覧です。twitterから拾いました。なので全てじゃないですし、見落としがあるかもしれません。報告を書くのにスライド探してたらいつの間にか一覧作成に熱中してしまった。

4th

  • Microservices Platform on Kubernetes at Mercari
    • https://speakerdeck.com/tcnksm/microservices-platform-on-kubernetes-at-mercari
  • Kubernetesによる機械学習基盤への挑戦
    • https://www.slideshare.net/pfi/kubernetes-125013757
  • LINE Engineerを支える CaaS基盤の今とこれから
    • https://www.slideshare.net/linecorp/line-engineer-caas
  • Cloud Nativeの未来とIBMの取組み
    • https://www.slideshare.net/capsmalt/jkdv1812keynoteibmcapsmalt
  • ZOZOTOWNリプレイスにおけるKubernetes活用
    • https://speakerdeck.com/tsurumi/zozotown-replace-kubernetes
  • コンテナネットワーキング(CNI)最前線
    • https://www.slideshare.net/motonorishindo/cni-124981353
  • IBM Kubernetesの全貌と始め方
    • https://speakerdeck.com/takara9/ibm-kubernetesfalsequan-mao-toshi-mefang
  • Kubernetes ネットワーキングのすべて
    • https://www.slideshare.net/linecorp/kubernetes-124878915
  • 1年間の本番運用でわかったコンテナがチーム開発にもたらしてくれたもの
    • https://speakerdeck.com/shoichiron/container-brought-to-team-development
  • Kubernetes がもたらす 分散システムの脅威との戦い
    • https://speakerdeck.com/koudaiii/v18-dot-12-number-containerdaysjp
  • 本番環境のKubernetesマニフェストに 最低限必要な 7 のこと
    • https://speakerdeck.com/masayaaoyama/jkd1812-prd-manifests
  • レガシーシステムのコンテナ化に挑戦した話
    • https://speakerdeck.com/wappy100/legacy-to-container
  • ミドルウェア〜Webアプリまで全てをHelm化したサービスの運用事例
    • https://speakerdeck.com/chokkoyamada/midoruuea-webapurimadequan-tewohelmhua-sitasabisufalseyun-yong-shi-li
  • 40 topics of Kubernetes
    • https://www.slideshare.net/tyoshio2002/japan-container-day-2018
  • 1人でできる
    Docker Kubernetes(GKE)を
    使った新規サービス立ち上げ

    • https://speakerdeck.com/spring_mt/docker-and-kubernetes-gke-for-new-services
  • 初心者がk8sでWPを運用するまでの学習事例
    • https://speakerdeck.com/yasuhiro1711/chu-xin-zhe-gak8sdewpwoyun-yong-surumadefalsexue-xi-shi-li
  • 高レイテンシwebサーバのGKE構築と beta機能アレコレのハナシ
    • https://www.slideshare.net/junpayment/webgke-beta
  • Ansible、Terraform、Packerで作るSelf-Hosted Kubernetes
    • https://speakerdeck.com/takaishi/jkd1812
  • ABEJAの映像解析を支える仕組みとRancher
    • https://www.slideshare.net/xecus/abejarancher-japan-container-days-v1812
  • Rancher2.0で実現する Managed Kubernetes Service
    • https://www.slideshare.net/linecorp/rancher20-managed-kubernetes-service
  • オンプレだってここまでできる。Kubernetesで作る自前PaaS
    • https://speakerdeck.com/yuhara/managed-kubernetes-on-premises
  • Kubernetesが超強力な分散RDBに vitessの真価を大検証してみた
    • https://speakerdeck.com/cotoc/20181204-vitess-jkd-day1

5th

  • Cloud Native プロダクト 1000本ノック
    • https://speakerdeck.com/masayaaoyama/jkd1812-cloudnativemeetup
  • これからのクラウドネイティブアプリケーションの話をしよう
    • https://www.slideshare.net/YoshidaShingo/ss-125006886
  • 深層学習推論環境構築ハンズオン
    • https://speakerdeck.com/asashiho/japancontainerdays2018-workshop
  • Kubernetes上で動作する機械学習モジュールの配信&管理基盤Rekcurd について
    • https://www.slideshare.net/linecorp/kubernetesrekcurd
  • Dockerセキュリティ: 今すぐ役に立つテクニックから,次世代技術まで
    • https://www.slideshare.net/AkihiroSuda/docker-125002128
  • GitLabによるコンテナCI/CDパイプラインのこれから
    • https://www.slideshare.net/ShingoKitayama/gitlab-auto-devops-with-container-cicd
  • Jenkins x Kubernetesが簡単だと思ったら大変だった話
    • https://www.slideshare.net/YamamotoMasaki/jenkins-x-kubernetes/
  • runc だけじゃないコンテナ low level runtime 徹底比較
    • https://speakerdeck.com/makocchi/jkd-20181205-about-low-level-runtimes
  • Kubernetesと暮らすRancherな生活
    • https://www.slideshare.net/gchiba/kubernetesrancher-125017022
  • 改めてDockerfileのベストプラクティスを振り返ろう
    • https://www.slideshare.net/ssuser1f3c12/introduce-that-best-practices-for-writing-dockerfiles
  • GitOpsではじめるKubernetes CI/CD Pipeline
    • https://www.slideshare.net/linecorp/gitopskubernetes-cicd-pipeline
  • Pharosでk8s環境を楽して割り切って作る
    • https://speakerdeck.com/w4yh/jkd1812-2t2-pharos
  • 完全コンテナベースで運用する Rancher on オンプレの ゼロタッチプロビジョニング
    • https://www.slideshare.net/ssuseraac79b/rancher-on
  • とある30秒でできるKubernetes + GPU 開発環境
    • https://speakerdeck.com/xibuka/toaru30miao-dedekirukubernetes-plus-gpu-kai-fa-huan-jing
  • コンテナプラットフォームとしてのApache Mesos
    • https://speakerdeck.com/tsukaman/apache-mesos-is-he
  • Kubernetes Meetup Tokyo 2年間の振り返りと未来
    • https://speakerdeck.com/superbrothers/kubernetes-meetup-tokyo-looking-back-for-two-years-and-the-future
  • Runtime BoF 議事メモ (公開)
    • https://docs.google.com/document/d/14U_d5PLgcB25nja4Ox9VHF9AjuVWqxzWGso1xkcvg1Y/edit

おまけ:そのほかtwitterで呟かれていたリンクたち

  • https://www.sitespeed.io/
  • https://github.com/fluent/fluentd-kubernetes-daemonset
  • https://github.com/Rekcurd
  • https://github.com/weaveworks/flux
  • https://developer.ibm.com/jp/technologies/containers/
  • https://azure.microsoft.com/en-us/blog/bringing-serverless-to-azure-kubernetes-service/
  • https://github.com/containerdaysjp/showks-docs/blob/master/spinnaker/setup.md
  • https://github.com/containerdaysjp/showks-canvas-haruelico/pull/2
  • https://projectriff.io/
  • https://support.treasuredata.com/hc/en-us/articles/360001457427-Presto-Query-Engine
  • https://github.com/vitessio/vitess/blob/master/data/test/vtgate/unsupported_cases.txt
  • https://aws.amazon.com/jp/blogs/compute/introducing-aws-app-mesh-service-mesh-for-microservices-on-aws/
  • https://github.com/rancher/norman
  • https://www.creationline.com/kubernetes-training
  • https://github.com/operator-framework/operator-lifecycle-manager
  • https://github.com/kelseyhightower/kubernetes-the-hard-way
  • https://abejainc.com/ja/news/article/20181204-2352
  • https://itunes.apple.com/jp/podcast/fukabori-fm/id1388826609?mt=2&i=1000424961715
  • https://qiita.com/advent-calendar/2018/zlab
  • https://github.com/icholy/ttygif
  • https://github.com/mjording/ttyrec
  • https://github.com/databus23/helm-diff
  • https://k8s-docs-ja.connpass.com
  • https://github.com/everpeace/kube-throttler
  • https://github.com/mercari/certificate-expiry-monitor-controller
  • https://github.com/kubeedge/kubeedge
  • https://github.com/virtual-kubelet/virtual-kubelet

サンタクララに行ってきた

忙しくてまとめる暇もなく、1週間たってしまった。書かないと忘れそうなので、メモっておく。ここには仕事以外を書く。

13日の夜24:05発で行って、19日の夜23:35着でサンタクララに行って帰ってきた。

英語について。
はじめての海外旅行なのに、2日目にディスカッションで英語を話す機会もあったおかげで、英語を話す抵抗感がなくなった。
行く前はほとんど聞くばかりだと思っていたけど、おもいのほか話す機会が多くて、結果的にはよかった。
そうはいっても、カンファレンスでマス向けに話す英語ははやくて何を言いたくて話しているか聞くのがやっと。ジョークは5つに1つしかわからない。でも、一対一で話すと相手が手加減してくれるのもあって、普通に会話できた。
やっぱり外に出るのははやければはやいほどいいと思う。そういう意味で環境っていうのは大きい。親をはじめとして周囲に海外に行ったり来たりするひとはいなかったからなあ。

ネット環境について。
13日の昼間ぎりぎりに調べた結果、空港で海外で使えるWiFiのような「MiFi」というのが借りられると知って急遽借りることにした。1週間7000円。100%保険をかけたからちょっと高くなったけど、これが大正解だった。カンファレンス会場はWiFiがあったけど、ホテルは有料だったので、MiFiをつけっぱなしにして、ずっとUstreamでNHKをみていた。

電話について。
電話は事前に購入したIDEOSを使った。事前に調べて、IP電話ならアメリカでもそのまま国番号を入れることなく日本の番号でかけられるらしく、やってみたら本当にその通りだった。IP電話なので、災害による制限をくぐりぬけることができる点もよかった。

食事の注意点。
あらかじめレジで料金を払う食堂や、マクドナルドは日本と同じ。
レストランで食事するには、最後に料金を払うところだけ注意すること。チェックを要求して、料金が書かれた紙をもらって、料金の下にチップを書く欄がある。だいたい10%くらいできりがよくなる金額にして、さらにしたにある合計金額を記入する。最後にその金額をおいて出る。調べると人を呼んで渡す方がよいとあるが、自分はそうしなかった。どっちがいいんだろう?

ホテルの注意点。
毎日部屋を出るときに、掃除してくれる人向けのチップとして、ベッドに1ドル置いて出る。遅くなるときは、ドアの内側に「Private」と書いたカードがくっついてるので、それをルームカードをさすところに挿しておく。

天気/環境について。
事前調査では、最低7,8℃、最高15℃くらい。まあ、外はそれくらいだけど、部屋がとても寒い。外にでるときの洋服をそのまま着ていても肌寒い。できれば中にもう一枚着たほうがいい。

全方向にかけられるアイロンが気になる

最近電車に乗ると必ず液晶モニタの宣伝でアイロンが出てくる。いまさらアイロンかよ、と思っていたが、アイロンの後ろも前と同じようにとがっていて、簡単にバックできるようになっているらしい。
使っているのを見ているととても気持ちよさそうだ。使ってみたいが、うちはワイシャツもクリーニングに出しているので使う機会がない。ズボンプレッサーはあるが。。
そもそもアイロンを使ったのは何年前だろう。中学生のころ家庭科でやっただけかもしれない。
amazonで検索したら出てきた。さすがに高いな。

Rubyラーメン?!

市をあげてRubyを応援している(!)松江市にある中隆という食品会社から

Ruby on 松江ラーメン・キュービックシリーズ

という名前のラーメンが発売された。見た目がこれ。

http://www.mengurume.co.jp/ruby/index.htmlからたどれるプレスリリースを読むと必死さが伝わってきたし、けっこう松江ラーメンは有名らしい。

買うしかないでしょ、ととりあえず2つアマゾンで購入。

Seasar2流行ってる?

昨日書泉に行ったらSeasar2の本が山積みになっていた。もう半年以上前の本なのに。Seasar2流行ってる?
実は今度Seasar2使おうかなぁ、と思って先週からSeasar2の本を読みつつチュートリアルを動かしていたんだよね。